Creating an Animated Character Step by Step
00:00
To create a new file, restart seamless.
Click the create box button: ![]()
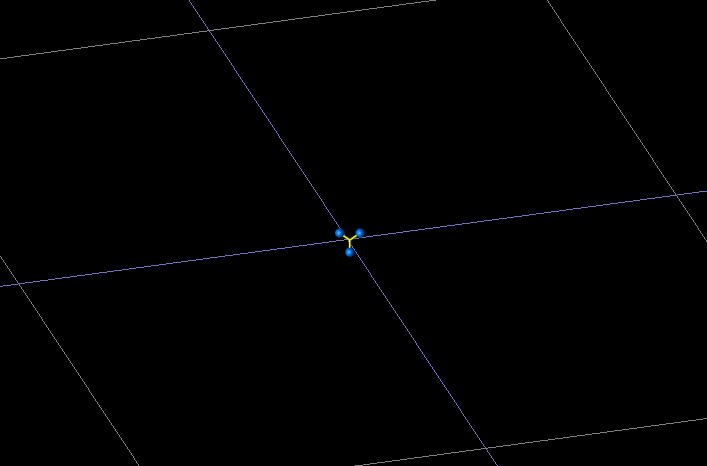
Click where the 2 centre lines in the grid intersect to set the
position of the box,
 click to set the size of the base,
 and click to set the height.
00:15
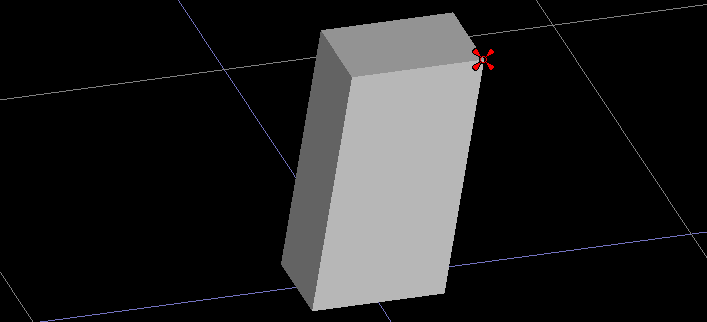
Like a fully grown caterpillar, the task of our box is complete
and is ready to be converted to nurbs patches so that we can
begin nurbs patch modelling. Convert the box to a patches by
clicking the butterfly button: ![]()
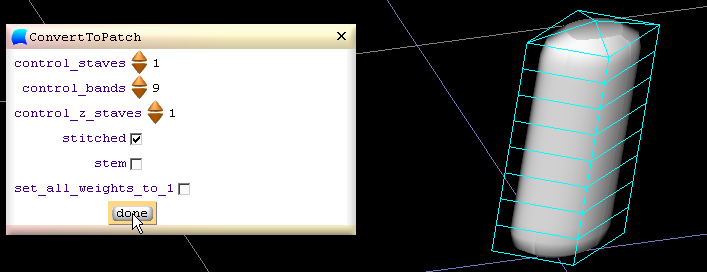
Increase the number of control bands to 9 and then click done.
00:34
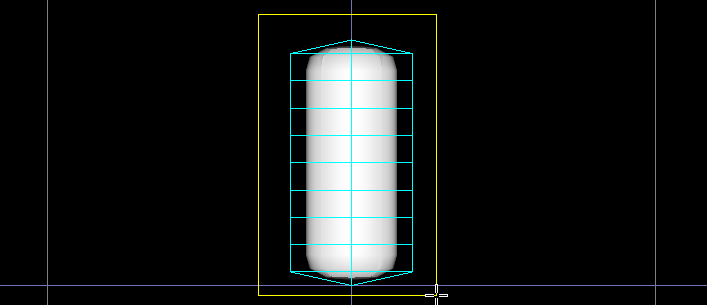
So that we can see where our body is positioned with a front on
view ![]() , open the grid
, open the grid ![]() control panel and click the xyPlane
check box.
control panel and click the xyPlane
check box.
Zoom out a little using the mouse wheel.
To move our view up, click on empty space and drag down until
the centre horizontal
line in the grid is right down at the bottom of our view.
00:55
We can drag each point one at a time to shape everything but the
rectangle selection and the lever tools can greatly speed things
up and they're easy to learn by using them.
01:06
Before using the rectangle selection tool to select all our
points, click the backface ignore button ![]() to toggle out
to toggle out ![]() of ignore mode so that all control
points including the points at the back of our model, get
selected.
of ignore mode so that all control
points including the points at the back of our model, get
selected.
01:18
 To select the points with the
rectangle selection tool, hold down the shift key and drag out a
rectangle to surround all the points in the model.
To select the points with the
rectangle selection tool, hold down the shift key and drag out a
rectangle to surround all the points in the model.
01:26
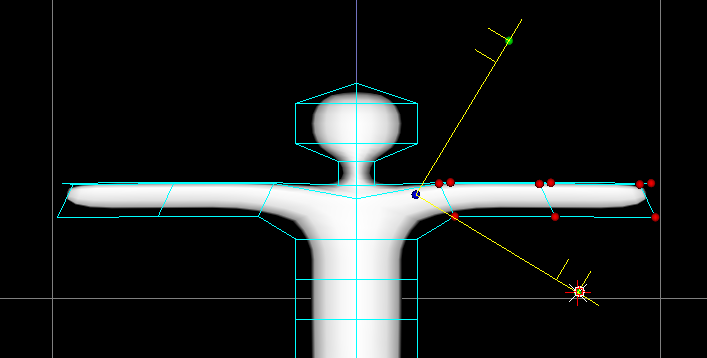
After selecting the points the lever tool appears. It has a blue
pivot point at the base of the 2 levers.
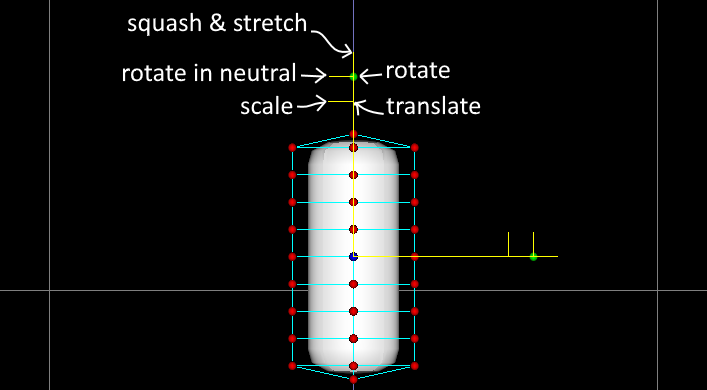 Each lever has 5 active points to perform different
tasks, which are: translate, rotate, squash and stretch, rotate in
neutral and scale.
Each lever has 5 active points to perform different
tasks, which are: translate, rotate, squash and stretch, rotate in
neutral and scale. 01:50
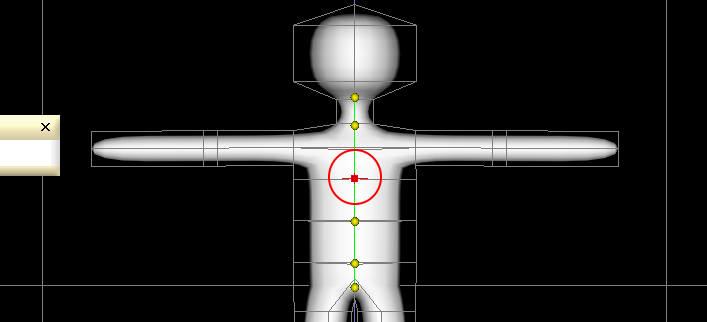
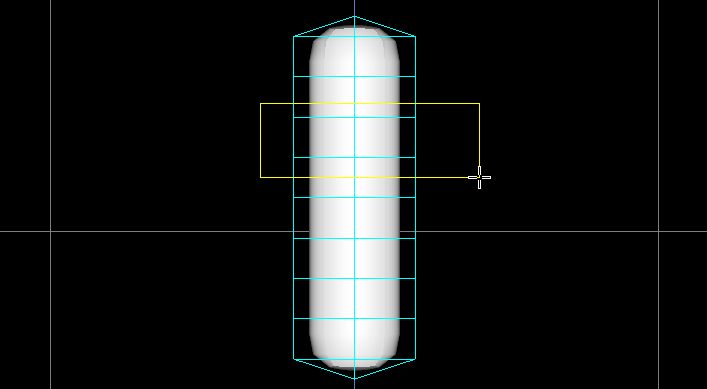 Define the neck and head by selecting
these 2 rings of points
Define the neck and head by selecting
these 2 rings of points
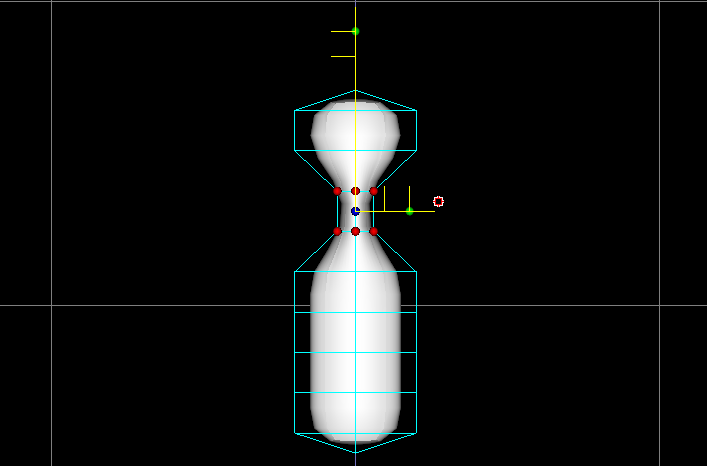 and squashing them in
and translate up a little.
Now the torso wants to be translated up a
little.
02:01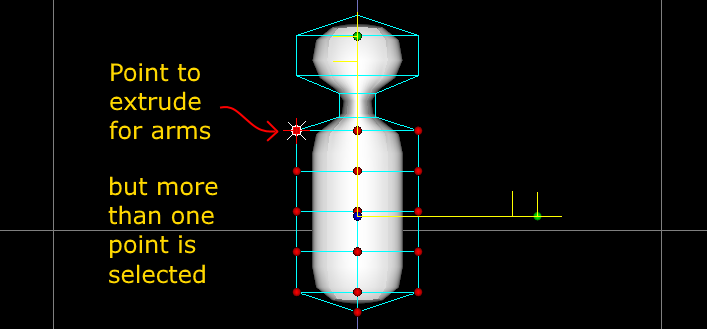
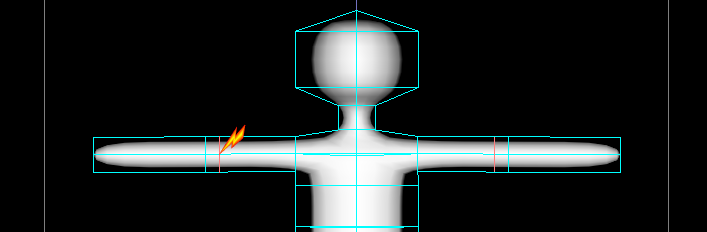
To extrude the arms we want only this point selected. Because it
with a number of other points are selected we want to first
unselect the points which can be done by clicking on the 3d
window while holding down the shift key.
 Now we can select this point
by clicking it and click extrude
Now we can select this point
by clicking it and click extrude 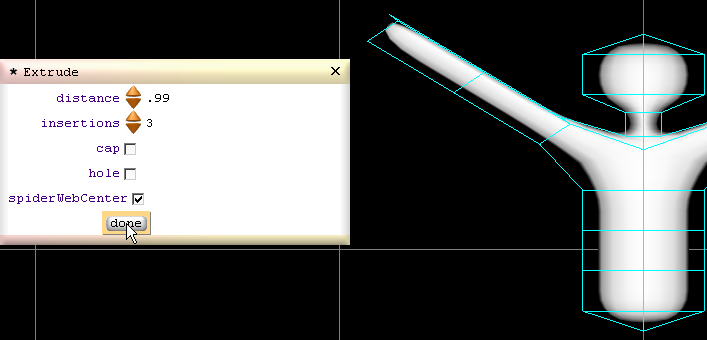
Increase the distance, increase the insertions to 3 and tick the
spiderWebCenter check box.
02:24
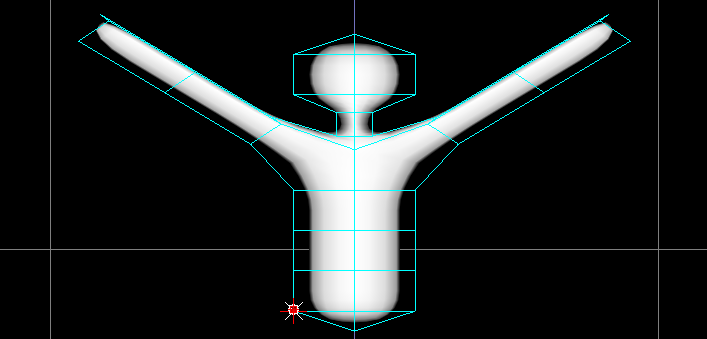 Extruding the legs is much
the same, click this point, click extrude
Extruding the legs is much
the same, click this point, click extrude ![]() ,
,

increase the distance, increase the insertions to 3 and tick the
spiderWebCenter check box.
02:35
Drag with the right mouse button held down to change the view
orientation.
It's important to keep looking at our model from different view
orientations while we work on it, so that we properly understand
what we're doing in all 3 dimensions.
02:47
For our default pose we want our legs going straight down,
vertically, so we need to rotate the leg points.
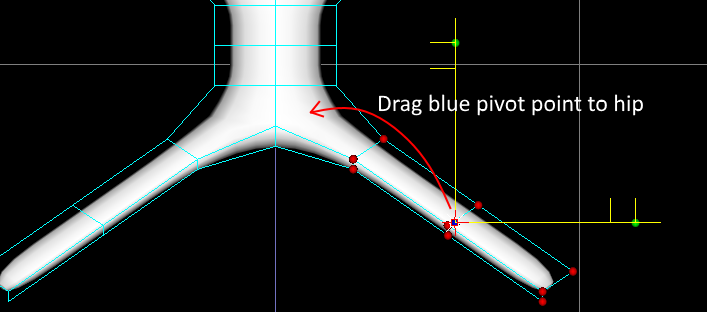 To do this first select the
leg points and drag the pivot point up to the hip
To do this first select the
leg points and drag the pivot point up to the hip
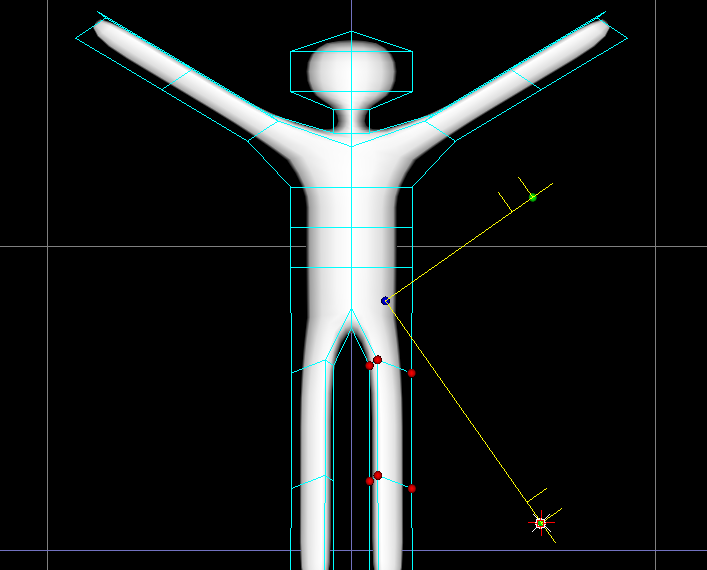 and then
drag the rotation point on the lever.
and then
drag the rotation point on the lever.
03:03
 We want our arms to go out straight
horizontally. If we can't select all of the points inside one
rectangle, toggle
We want our arms to go out straight
horizontally. If we can't select all of the points inside one
rectangle, toggle ![]() into accumulate selection mode
into accumulate selection mode ![]() , which allows us to select additional points
without loosing the point's we've already selected.
, which allows us to select additional points
without loosing the point's we've already selected.
03:18
We can drag the arms down a little by dragging any one of the
selected points. When moving points this way we're free to drag
the points in any direction where as when translating the points
using the lever, the selected points can only be moved in the
direction of the lever.
03:33
We want to move the 2 inner lines in the legs a little so lets
select them and move them closer to each other. Oops the points
in the arm remain selected
because we are still in accumulate selection mode so we need to
toggle out of that mode first. Now we can select the leg points
and squash them in.
03:53
Our feet are going through the floor so lets drag our model up
some.
To avoid accidentally straying to the left or right like this,
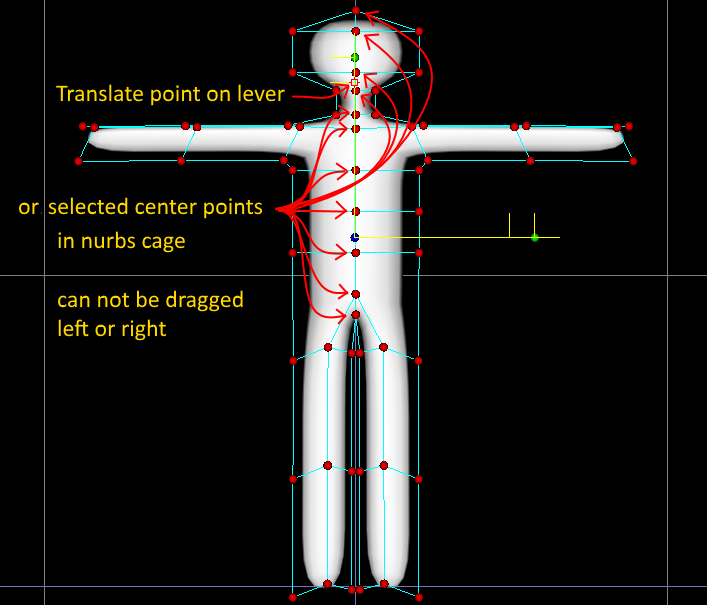 use the
lever's translation point or drag one of the selected centre
points.
use the
lever's translation point or drag one of the selected centre
points.
04:05
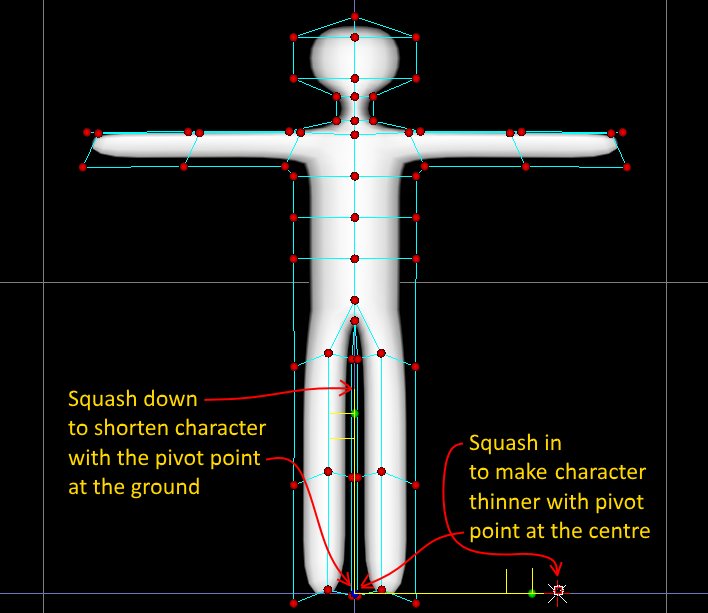 If we
want to shorten our character by squashing it, drag the pivot
point to the ground level first so that we squash towards it's
feet which will prevent the feet from rising up. And when
squashing to make our character thinner, have the point centre
of left and right.
If we
want to shorten our character by squashing it, drag the pivot
point to the ground level first so that we squash towards it's
feet which will prevent the feet from rising up. And when
squashing to make our character thinner, have the point centre
of left and right.
04:23
I want a rounder head.
04:27
The upper lines of points in the arms should be more evenly
spaced from the middle lines. Zooming in can help us work when
points are close to each other like this. If the operation we
want to perform looks a bit awkward, it's often worth trying a
different view orientation.
04:43
With this side on view we can improve the neck and the shape of
the head.
A stretch and now a translate forward looks good.
Dragging a few points individually is all we need to do here.
04:57
Stretching the legs from this view rounds our legs nicely.
05:01
To flatten a ring of selected points, squash the lever down
towards the pivot point.
05:09
I find keeping the points neatly positioned helps me understand
how the model is structured.
05:19
Looking at how thick the arms are in relation to the legs, I
want the arms a little thinner.
05:24
To insert a line of points, click the insert control line ![]() button.
button.
05:28
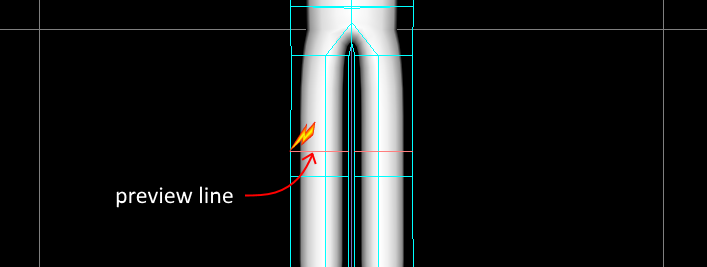 Now when our cursor hovers over a control line,
a preview line appears to show where the insertion will be made.
When the preview is showing where we want
Now when our cursor hovers over a control line,
a preview line appears to show where the insertion will be made.
When the preview is showing where we want
it, click to hold and then click done.
 Inserting
rings just before our knees and elbows will improve how our
limbs look when animated.
Inserting
rings just before our knees and elbows will improve how our
limbs look when animated.
05:48
We're now ready to add the skeleton. To add the bones we must be
in skeleton edit
mode: ![]()
05:54
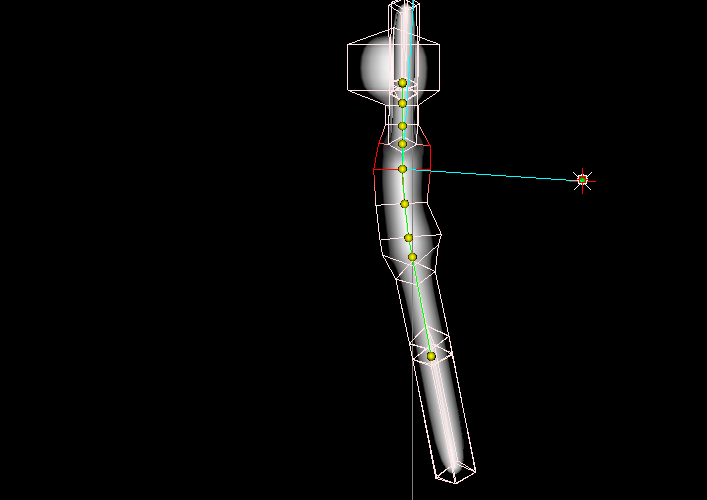
 This red point is the pivot point of
the bone that already exists in our model. We'll make this bone
the pelvis, so lets drag it to an expropriate location for the
pelvis.
This red point is the pivot point of
the bone that already exists in our model. We'll make this bone
the pelvis, so lets drag it to an expropriate location for the
pelvis.
06:05
To add more bones click ![]() .
.
Each time we click we add a bone with its pivot
point at the location of where we clicked.
06:15
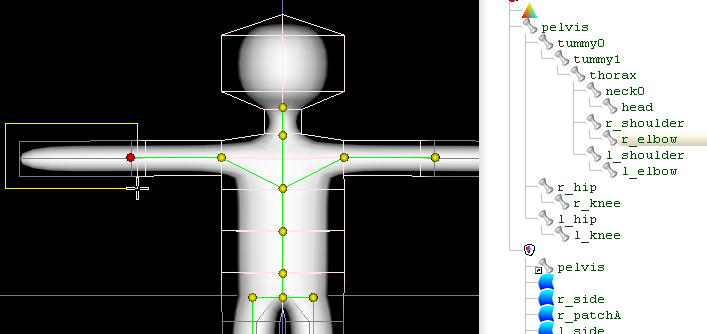
 After adding all the bones for the
spine we want to click this point so that the arm bones branch
out from here in the spine.
After adding all the bones for the
spine we want to click this point so that the arm bones branch
out from here in the spine.
06:22
Now we want to add the bones for the legs. Opps! we forgot to
select the pelvis.
06:29
To delete a bone, click ![]() . Now with the pelvis
selected, we can add the bones for the legs.
. Now with the pelvis
selected, we can add the bones for the legs.
06:36
If we click on a bone already added, we can drag it. We can drag
like this ![]() where all the descendent bones move along with the
bone we are dragging, or in this
where all the descendent bones move along with the
bone we are dragging, or in this ![]() mode, we can drag it without any descendants
moving with it
mode, we can drag it without any descendants
moving with it
06:48
In the scene tree ![]() window we can see our
bones represented by these part
window we can see our
bones represented by these part ![]() nodes.
nodes.
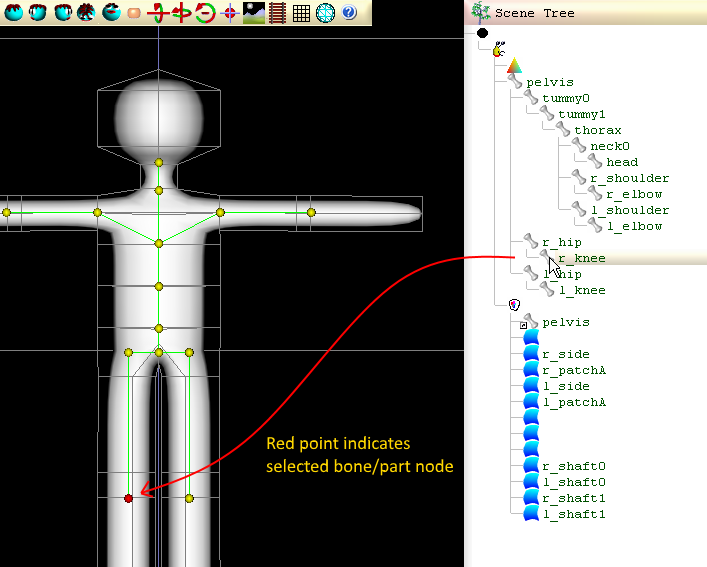 Here we can write in the names
for the bones.
Here we can write in the names
for the bones.
06:56
For the right arm and leg bones, name them beginning with r_ so
that the left bones are automatically given the same name except
the
r_ is replaced with a l_
07:07
To specify which control points in the nurbs cage are owned by a
bone, click ![]()
to go into paint colour coded control points mode.
07:17
Use the rectangle selection tool to select the points for
ownership of the selected bone.
07:29
Click ![]() to go into animation mode.
to go into animation mode.
07:32
We want to make our animation last 2 seconds by clicking ![]() to add a second to the time
line.
to add a second to the time
line.
07:38
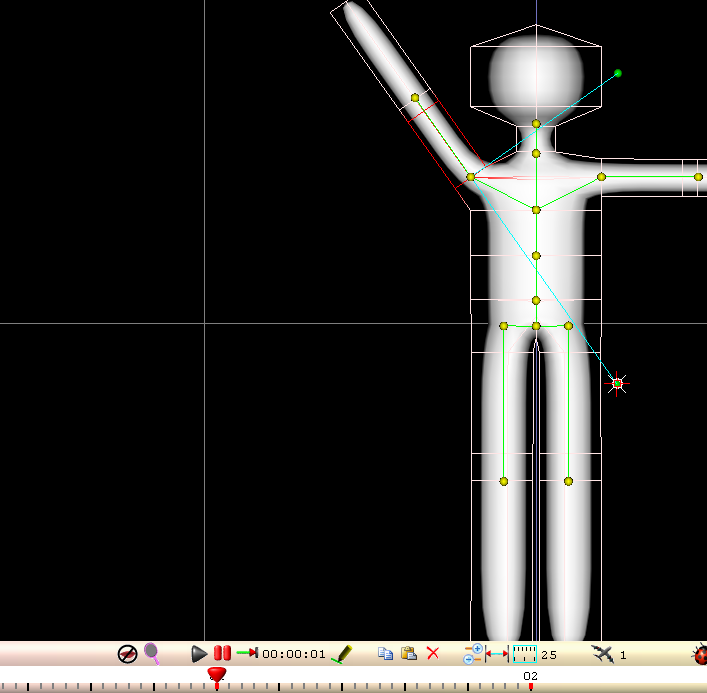
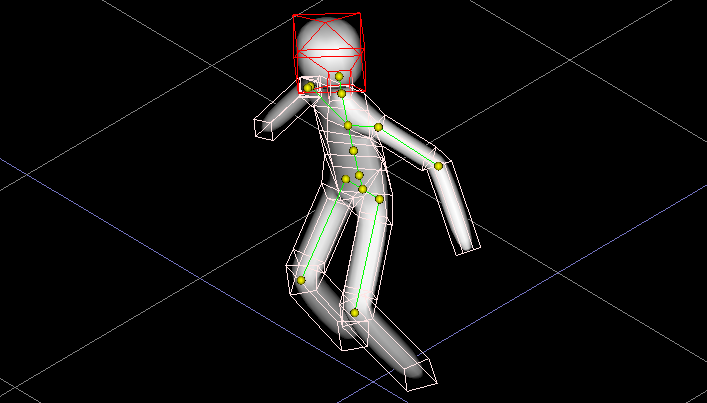
To do a simple animation, all we need to do is drag the anim
slider ![]() to where we want to pose our
model, click on a bone, drag the lever and click play.
to where we want to pose our
model, click on a bone, drag the lever and click play.
07:51
If we want our arm to wave down at the end of the wave, drag the
shoulder's lever with the slider positioned at the end of the
wave.
08:00
 If we want to copy the exact pose from this point
in time to another, click the anim bar 's copy
If we want to copy the exact pose from this point
in time to another, click the anim bar 's copy ![]() button, drag the slider
button, drag the slider ![]() , click paste
, click paste ![]() and then click ok.
and then click ok.
08:10
If we want the animation to keep repeating, click the loop ![]() /
/ ![]() button.
button.
08:16
From our wave we can go on to make a star jump. We want the
right arm animated the same as the left.
08:21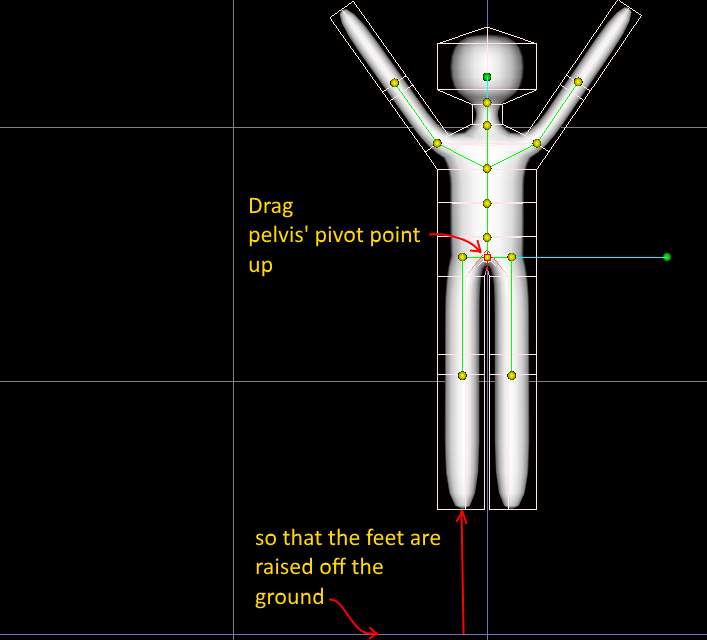 To move our character up in
the air, drag the pelvis' pivot point.
To move our character up in
the air, drag the pelvis' pivot point.
 We
want the legs to rotate out.
We
want the legs to rotate out.
We want the left arm down the same as the right at the start
of the jump, now lets copy the start pose and paste it at the
end of the time line.
08:42
We can improve our jump if we also pose it from a side view ![]() .
.
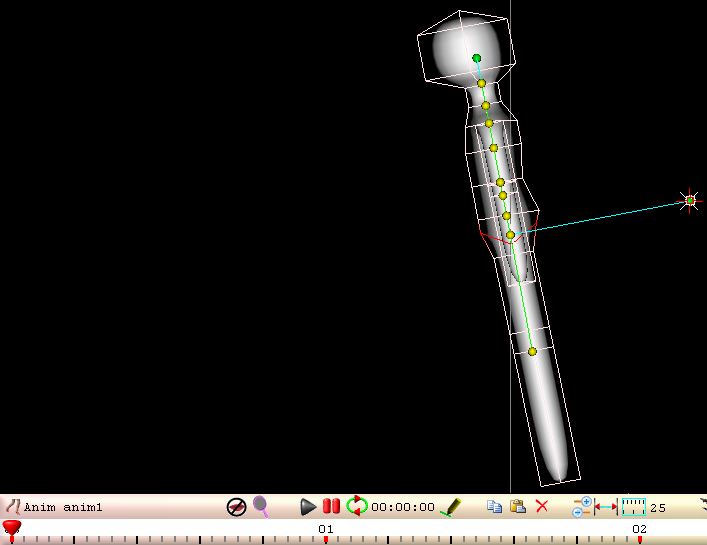 Let's lean the whole character forward and bend
the legs.
Let's lean the whole character forward and bend
the legs.
 To select the right hip, we must first
change the view, otherwise we would select the left hip because
the left hip is the closest to our viewpoint.
To select the right hip, we must first
change the view, otherwise we would select the left hip because
the left hip is the closest to our viewpoint.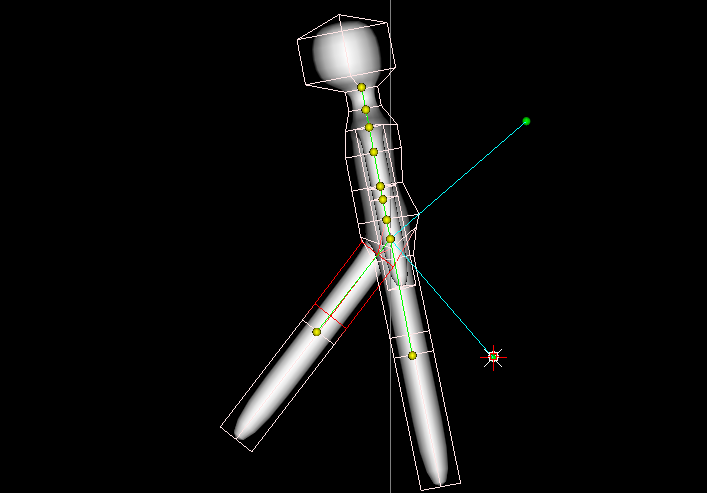
09:00
Now our feet are off the ground at the start of our jump so lets
drag the pelvis down.
09:08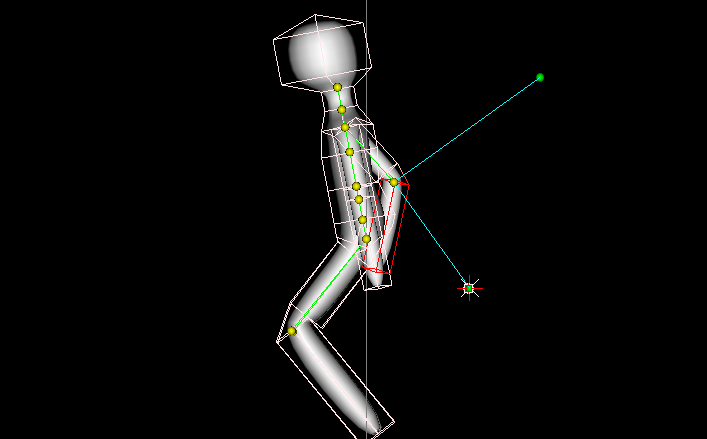 Now lets pose the shoulders and
elbows with a side view.
Now lets pose the shoulders and
elbows with a side view.
09:13
Now that we have posed all these joints to our liking for the
start of the jump cycle,
lets copy the pose and paste it to the end of the cycle.
09:21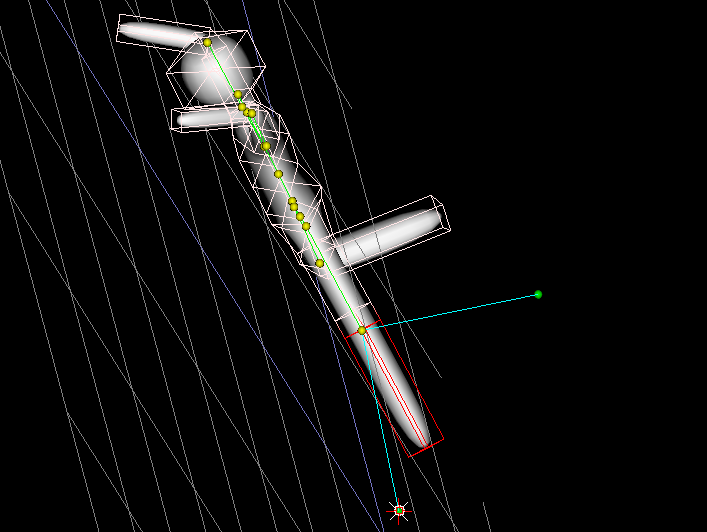 Now lets
straighten out the limbs at the peak of the jump. Orientate the
view so that we don't end up needing to untwist the limbs. With
practice this will feel much more intuitive to get right.
Now lets
straighten out the limbs at the peak of the jump. Orientate the
view so that we don't end up needing to untwist the limbs. With
practice this will feel much more intuitive to get right.
09:39
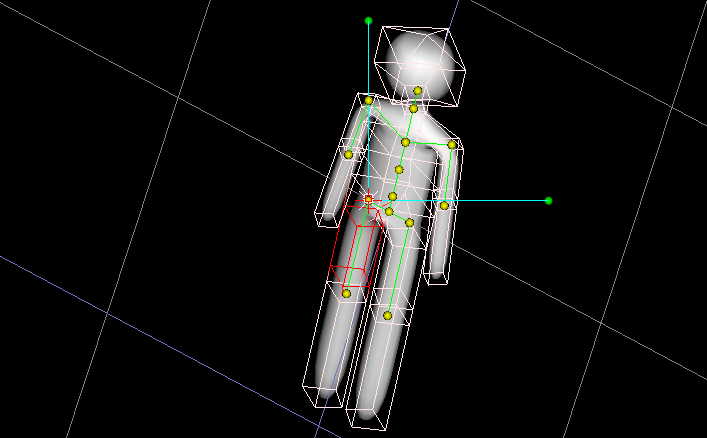
 Bending each joint in the spine back a little to
arch the back should make our character look a lot less wooden.
If we are unsure which bone is which from a given view, change
the view before selecting the bone.
Bending each joint in the spine back a little to
arch the back should make our character look a lot less wooden.
If we are unsure which bone is which from a given view, change
the view before selecting the bone.
That looks a lot better, especially from a tilted viewpoint.
09:57
We can still improve our jump significantly with very little
effort, by making our character slow down as it reaches the peak
of the jump. To do this all we need to do is move the slider to
a position somewhat close to the peak and drag the pelvis up so
that it is just a little less in height than what it is at the
peak.
Do the same for when the character is just starting to fall back
down.
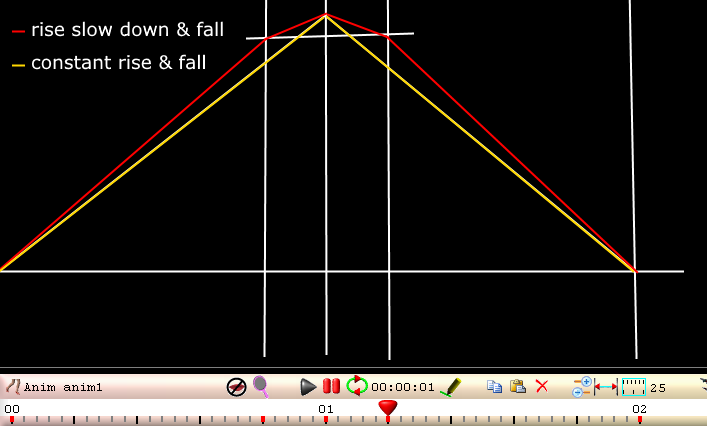
10:30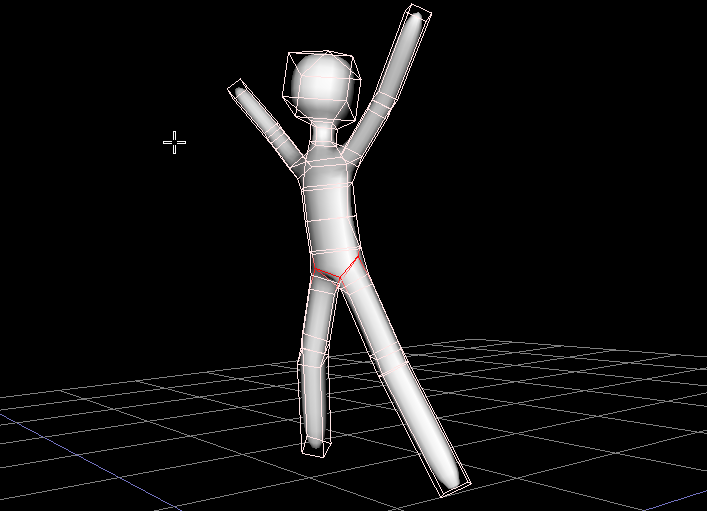 There
that makes it feel much more like gravity is acting on our
character to bring it back down to earth.
There
that makes it feel much more like gravity is acting on our
character to bring it back down to earth.
[3d Modelling Software] [Tutorials] [Forum] [Features] [Download] [Gallery] [FAQ] [Worlds] [Avatars] [Links] [Thyme]