Features
This page is out of date but is being gradually updated for Seamless3d III.
Seamless3d is a fast efficient 3D Modeller/Animator that is less in size to download than Flash. Its ideal for making high quality animated movies, optimizing models for real time graphics and lets you log into the Seamless3d chat server to chat and show your work to fellow Seamless3d modellers.Beginner Friendly Design
Fast Click Skeleton Creation
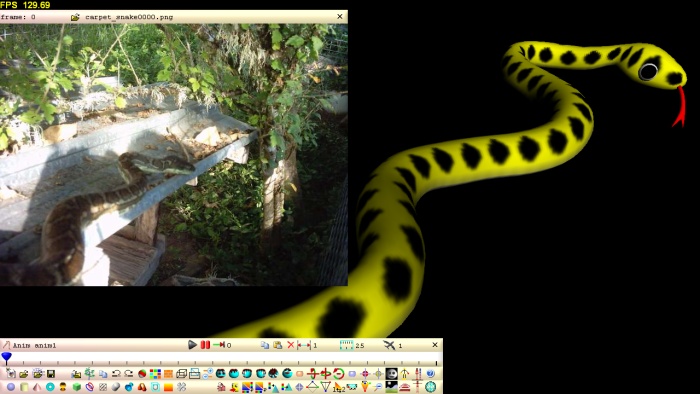
New bones can now be added very quickly by clicking in the 3d window while holding down the right control key. New bones can also be inserted between 2 joints by clicking on the line that joins them. To see the this feature being used watch the Nurbs Lathe Robot Demo.
Sphere, Cylinder, Cone, Torus, Box, Rectangle, NurbsLathe and BendyLathe Objects
Geometry can easily be added to the skeleton's bones by simply selecting the bone in the Scene Tree window and clicking on any of the following buttons in the toolbar:The object's control panel allows you to easily change the object's dimensions and position and orientate it. NurbsLathe's and BendyLathe object's shapes can easily be modified by dragging control points in the 3d window.
Convert to NurbsPatch
Sphere, Cylinder, Cone, Torus, Box, NurbsLathe and BendyLathe objects can easily be converted to NurbsPatches by right clicking on the object's icon in the scene tree window. and selecting convert to nurbs. This offers a lot of freedom to the beginner to control the shape intuitively.Intuitive Animation Bar
To animate, all the user has to do is plug an Anim bar into the scene node, click on the Anim node to put seamless into Anim mode and pose the model at different points in the time line.Robot Demonstration Help
The Seamless3d Robot Demos simulate a user using seamless3d. The demos are broken down into operations. The operations can be played in any order and repeated as many times as needed. All of the clicks and keys used are displayed in the status bar. Because the demos are simulations not movies, you are guaranteed nothing is ignored to complete the task. The demos can be selected by pressing F10 and then selecting help.NURBS Modelling
Multiple Control Point Selection & Manipulation
Multiple control points from any number of patches can be selected by dragging with the mouse while the left shift key is held down. Once selected you can:
- Translate (move): drag one of the selected points
- Rotate 1D: Drag the orientation lever
- Stretch/Squash 1D and Rotate: Control Shift while dragging the orientation lever
- Stretch/Squash 1D: Alt while dragging the orientation lever
- Stretch/Squash 2D: Alt Control while dragging the orientation lever
- Stretch/Squash 3D: Alt while dragging one of the selected control points
- Orientation lever in neutral: Control while dragging the orientation lever
Selected control points can be un-selected the same way they are selected by holding down both the left control and shift keys.
To see multiple control point editing being utilised see the YouTube tutorial:
Making & Importing a Suit Tutorial Part 1 of 2
Making & Importing a Suit Tutorial Part 2 of 2
NURBS Control Ring Selection & Manipulation
When selecting multiple control points it is often necessary to select all the points in one or more rings within a patch. Whole rings can be slected by clicking on only one of the control points within the ring. See the tutorial: Selecting & Manipulating NURBS Control RingsRadial Tug

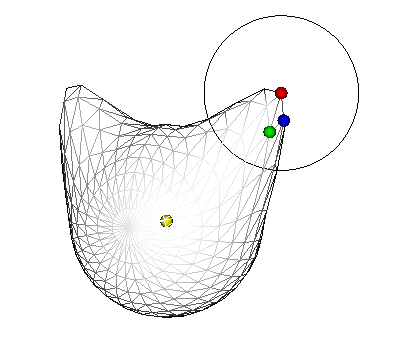
The radial tug lets you tug multiple control points at a time and have the amount each control point is tugged within a specified radius vary depending on how close they are to the center of the tug so that there is always a smooth transition to the unaffected control points. To use the radial tug first select a NurbsPatch in the scene tree window and establish a radius by clicking up on this button:
 from the toolbar.
When the radius is visible you can also resize the radius by dragging the control point located to the right on the radius (the red dot located on the cyan coloured circle)
from the toolbar.
When the radius is visible you can also resize the radius by dragging the control point located to the right on the radius (the red dot located on the cyan coloured circle)
Mirror Editingng
A NurbsPatch can be set to mirror another patch (for example a left arm mirror a right arm) or so that its left side mirrors its own right side.Stitching
Nurbs patches can be stitched together using control polygons to create complex structures. Once the patches are stitched they are as straight forward as single patches to modify the shape (just drag the control points).
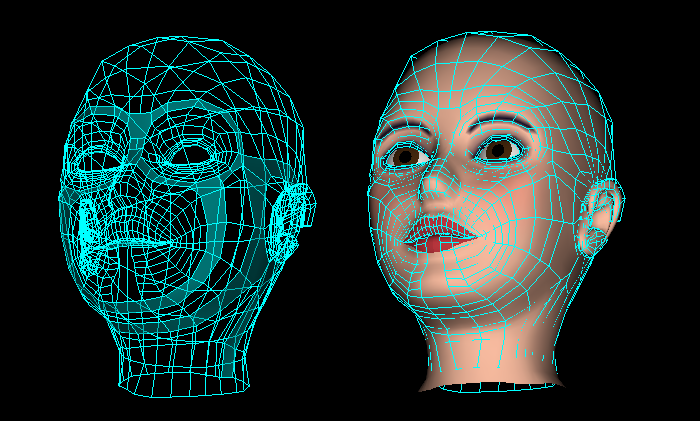
NURBS Surface Poly Editing (NSPE)
NSPE allows the user to hand edit the polygons on NURBS surfaces. This includes being able to drag the vertices anywhere along the NURBS surface as well as join the vertices together, break the vertices apart and colour them. NSPE has a significant advantage over simply converting a NURBS surface to a polygon mesh for editing because NSPE lets the user be able continue to modify the NURBS surface for the hand edited polygon structure.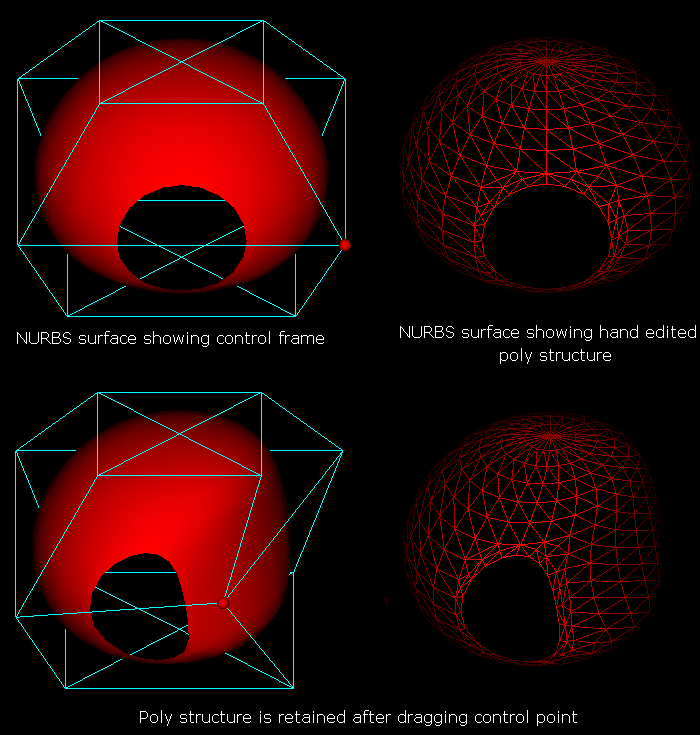
Because NSPE ensures that when a polygon's vertex is dragged it will always be on the NURBS surface, NSPE greatly helps the user to avoid unintentionally changing the shape of the model when optimizing for real time animation
Fusing NURBS Surfaces
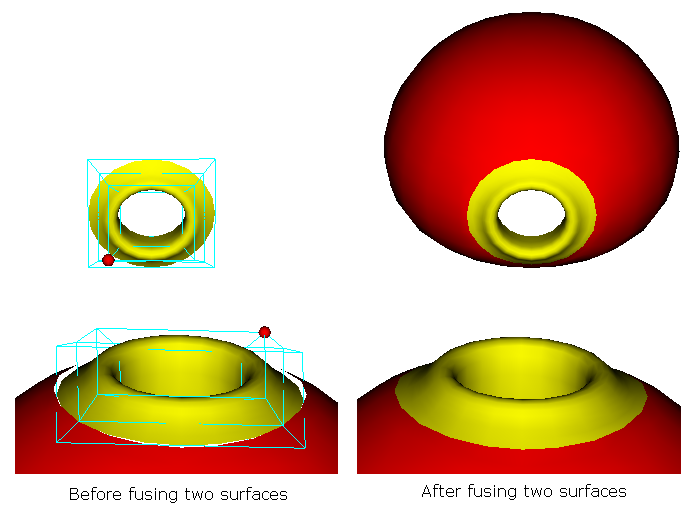
Fusing patches has some advantages over stitching, you don’t have to concern yourself with the number of control points matching up with the patch you are fusing it to but fused surfaces are not as straight forward to modify after they are fused and fused patches are less suited than stitched patches for nurbs control point animation.
Show/Hide Patch Control Cage
When nurbs modelling, it can be extremely helpful to only show the control cages for patches that you are working on. This does not hide the geometry like when you hide a part node, only the control cage is hidden and made inactive from modelling. A Patch can be toggled from showing or hidden by double clicking on the patch's icon in the scene tree.You can show all NurbsPatch control cages by pressing Alt A Hide all patch cages except the selected patch by pressing Alt S Hide any patch cage that has one of its control points selected by pressing Alt H
Poly Modelling
Multiple Vertex Selection & Manipulation
A vertex can be modified by simply clicking on it and dragging it. Multiple vertices can be selected for dragging by selecting them first. Multiple vertices are selected using the rectangle section tool by dragging with the left shift key held down.
Multiple Triangle Selection & Manipulation
Multiple triangles can be selected much the same way vertices can be by holding down the right shift key. Once the triangles are selected they can be deleted, cut away from selected triangles or coloured as shown in the tutorial/demo: Breaking, Joining and Colouring PolygonsBox Modelling
By being able to split selected strips of triangles, box modelling can be performed as shown in the robot demo: poly model avatar demoRadial Tug
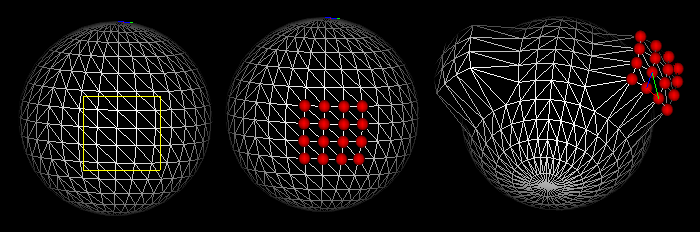
 The radial tug lets you tug multiple vertices at a time and have the amount each control point is tugged within a specified radius vary depending on how close they are to the centre of the tug so that there is always a smooth transition to the unaffected vertices.
To see the radial tug in action watch the
poly radial tug demo.
The radial tug lets you tug multiple vertices at a time and have the amount each control point is tugged within a specified radius vary depending on how close they are to the centre of the tug so that there is always a smooth transition to the unaffected vertices.
To see the radial tug in action watch the
poly radial tug demo.Mirror Editing
A part can be set to mirror another part (for example a left arm mirror a right arm) or so that its left side mirrors its own right side (for example a head part).Joining Vertices
A triangle’s vertex can be joined to another by simply dragging the vertex to the destination vertex and then pressing J. Many more options are available for how a vertex may be joined to another as shown in the tutorial/demo: Breaking, Joining and Colouring PolygonsAnimation
Colour Coded Ownership and Weight Painting
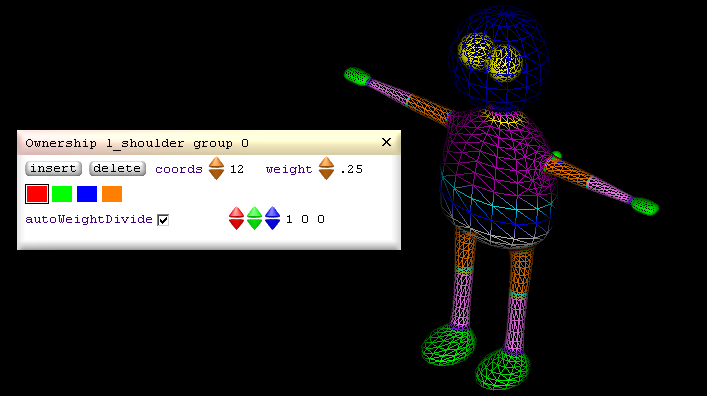
Seamless models can easily be rigged for animation by painting the nurbs control points (or vertices in the case of skinning) with colour coded ownership and weight values.
NURBS Control Point Animation & Morphing
Once rigged a nurbs model is easily animated by posing it at different points on the Anim bar's time line. The poses are automatically captured for playback. Morphing is also straight forward, you just have to drag a control point and the Anim bar will capture it for playback as shown in the video:
|
Beginners Nurbs Control Point Animation Tutorial |
Skinning and Poly Morphing
Once rigged a poly model is easily animated by posing it at different points on the Anim bar's time line. The poses are automatically captured for playback. Morphing is also straight forward, you just have to drag a vertex and the Anim bar will capture it for playback as shown in the video:
|
Beginners Skinning & Poly-Morphing Animation Tutorial |
The morphing nodes can be output to HAnimDisplacer nodes when output to vrml/x3d. When outputting poly morph animation to vrml or x3d make sure genHAnimNodes, genColorIndex and outScriptAsRoutes fields are ticked.
Inverse Kinematics (IK)
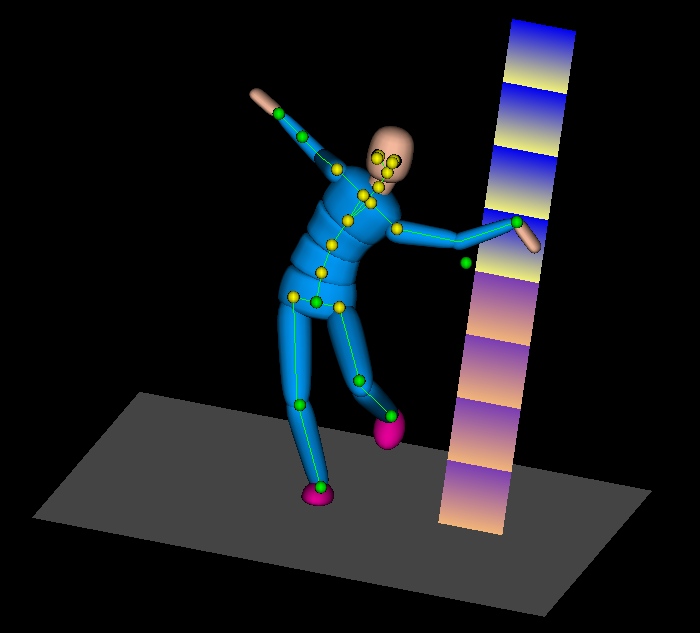
When I tried creating a walk animation late last year (Dec 2010), I could see it was going to be a constant battle stopping the feet from sliding about when they are meant to be firmly engaged on the ground and so decided to add an intuitive IK interface to seamless. Seamless has had IK years ago in the form of the AnimByAnkle node which used hoppy technology but the new IK Interface is greatly improved with draggable IK control points making it friendly even for a beginner. IK should be good not just for walking but also dancing, acrobatics, climbing etc.. For how to utilise IK see the new Robot Demo/Tutorial Introduction to Inverse Kinematics.
Forward Kinematics (FK) Blend
When developing IK and experimenting with it by creating a walk cycle for Lucy, I realised that I wanted the knees straight much of the time in the cycle but found IK hard to control when the knee joints are close to being straight (no bend). This lead to developing the FK blend feature. The 2 fields (which belong to the part node) used for blending are fka (FK angle) and fkb (FK blend). For more info and how to utilise FK Blend, see the tutorial: Advanced Inverse Kinematics.Position Compensation
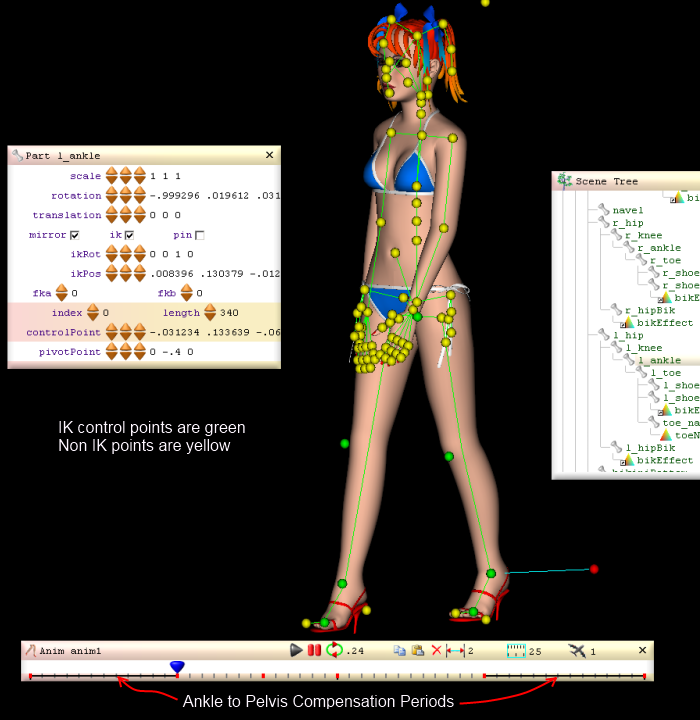
The FK blend helped keep the knees steady at specific points in the walk cycle but then I noticed there was a problem with the ankles sinking into the ground and rising above it at times. I found I had to add a number of key frames to adjust the pelvis to compensate. This lead to the development of the PosCompensator node which fixed the problem without the need to add extra key frames. The PosCompensator simply compares the ankle position at the beginning of a compensation period with the position of the ankle there after in that period and adjusts the pelvis with the difference. For more info and how to utilise the PosCompensator, see the tutorial: Advanced Inverse Kinematics.
X-Ray Mode
X-Ray mode lets you see all of the pivot points at once and how they are connected via lines. These points and lines form a visual skeleton and can be seen regardless of being in wireframe mode or not. X-Ray Edit Mode lets you drag any of the pivot points in the 3D window.Transform Animation
This feature lets you translate and/or rotate an animation.See tutorial Transform Animation tutorial.
Default Pose conversion
When importing an animation into an avatar, a common problem encountered will be that the default pose for the animation will not match the default pose for the avatar. For example compare the default poses for Zoe and Lucy: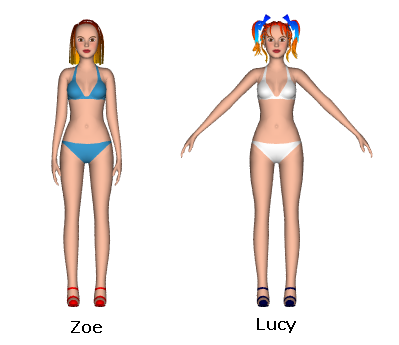
NURBS Defined Paths
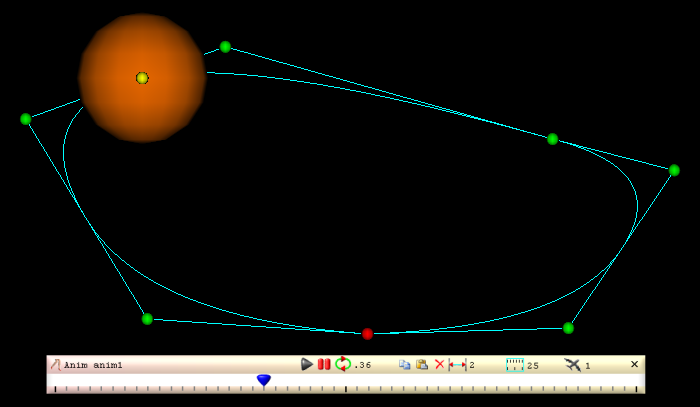
The NurbsTrack node lets you specify a path for a part to travel using a nurbs curve. This feature can be used for animating objects like cars, trains, aeroplanes etc. and for animating IK control points. One of the interesting things about this kind of animation, is you can modify your animation while the anim bar is playing. For how to use this new exciting and friendly animation aid, see Following a Curvy NURBS Path for Animation
Video Synchronization Animation Aid
Using real time video as a guide has proven itself in my lip synching animations. Much of the work in synchronizing my avatar to a real life video of myself speaking involved a lot of work going back and forth from a video player to seamless and manually calculating points in time. By making it so that the video can play inside 2.167 the synchronization of the video to the Anim bar is now taken care of by seamless. See the tutorial: Synchronizing the Anim Bar to Real Life Video
Import Animation
Animations can be imported from a smls (or a bvh file) file into another smls file as shown in the tutorial: Importing Gesture AnimationsVertex Colouring
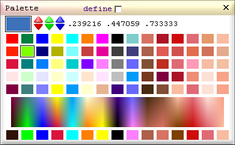
Palette Control Panel
Seamless3d supports colour per vertex for both poly and NURBS modelling. Colouring vertices is generally much easier than texturing so is ideal for beginners.The Palette Control Panel allows the artist to select and mix colours.
The video Modelling a Face From a Pre-Stitched Patches shows how vertices can be coloured in nurbs modelling.
The Nurbs Lathe Avatar tutorial/demo shows how nurbs lathes can be coloured.
The Breaking, Joining and Colouring Polygons tutorial/demo shows how vertices can be coloured in poly modelling.
ColorSweep
ColorSweep nodes let you colour a section of vertices with the colour gradually changing from one colour to another.A ColorSweep node can colour poly-maps before the triangles are mounded into shape. The following image is an example of this:

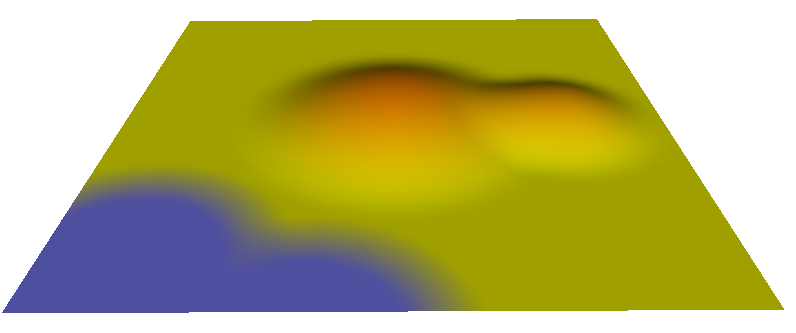
A ColorSweep can also colour the triangles after the triangles have been curved into shape. This makes it easy to create the following effect for a landscapes:
Textures
Texture Formats
jpeg png and bmp image files supported.Texture Mapping
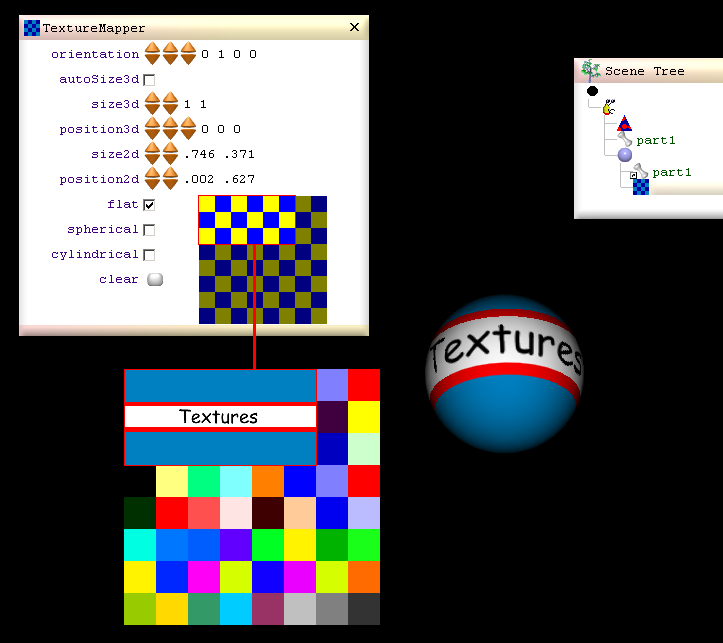
Nurbs makes texture mapping easy.
Coloured Poly-Map to Texture Conversion
Because seamless's nurbs polymaps are much like a texture map in that they are made up of 2D coordinates within the space of a 1 unit square, Seamless can easily convert the colours in a polymap to a texture. This feature in effect allows you to create textures in 3d space, by using NSPE to create the poly-maps.Making Movies
FFmpeg Support
Because Seamless3d supports FFmpeg it is very easy to convert animations to movie files as shown in the tutorial: Making Movies.POV-Ray Support
You can quickly make movies from screen shots or by ray tracing via POV-Ray. Seamless3d has specialised fields for setting Pov-Ray lights adnd materials. See the tutorial: Rendering the Frames Using POV-RayMovie Formats
You can create AVI, MPG, MP4 and FLV movie formats by clicking the appropriate check box for export. By manually instructing FFmpeg many more options are avilable.Import and Export Formats
Import & Export BVH Motion Capture Files
Seamless3d can export animations to BVH by right clicking on the Anim bar and selecting export to bvh.BVH files can be opened just as easily as opening native smls files and so Seamless3d can be used as a quick BVH file viewer. When bvh files are opened the same way as opening native files, Seamless3d creates a simple nurbs lathe avatar from the BVH joints. By simply doing a "Save As" you can quickly convert bvh to smls.
BVH files can also be imported as gestures into existing models.
.
Import VRML
Seamless3d can load Sphere, Box, Cylinder, Cone and IndexedFaceSets and rendered in real time and can also be converted to native Seamless nodes.Textures and colour per vertex is supported.
TimeSensor and Interpolator nodes and ROUTEs can be imported and converted to native Anim nodes and scripts.
Import X3D VRML Classic Encoding
As well as being able to import VRML97 nodes, X3D H-Anim and IndexedTriangleSet nodes can be imported and converted too native Seamless nodes.Export VRML & X3D
Export for both X3D VRML classic and XML encoding is supported.Export & Import H-Anim
When exporting Skinned models to H-Anim, native Part nodes are converted toHAnimJoint nodes and when exporting poly morphing, CPMorpher nodes are exported to HAnimDisplacer nodes.
HAnim joints nodes can be imported and converted to native Part nodes. See tutorial: Import HAnim Avatar
Import Blaxxun Avatar Studio
Seamless3d can import avatars from Blaxxun/Canal Avatar studio. The mesh, texture maps and gesture animations will all import. See tutorial: See tutorial: Importing Blaxxun Avatar Studio Avatars
Export OBJ
When outputting obj, normals and texture maps are exported.Sound Synthesis
Synthesizing Sounds Using NURBS
This feature is currently being redesigned to make it easier to synthesize sounds including speech.Scripting
SeamlessScript
Seamless3d has its own built in script compiler which compiles SeamlessScript (a very fast light weight scripting language) into native machine code. SeamlessScript is designed to look and feel a lot like JavaScript while being able to be compiled by a standard C++ compiler. This allows the user to develop complex animation sequences using a C++ IDE which gives the user access to professional debugging aids such as single step execution. For more info see: Seamless3d modelling LanguageC++ Interface
Because Seamless3d is open source software with very few restrictions on the licence (less restrictions than the LGPL) and is a small compact program, you can easily compile your own scripts to be part of Seamless3d. This lets you use Seamless3d as a base for developing all sorts of stand alone 3d applications including games with few if any restrictions. See tutorial: Bind Nodes from a .smls/.wrl file to the Source Code for Seamless3dSeamless Chat
Worlds & Avatars
Chat with friends in 3d using the seamless3d modeler as the chat client. You can use public avatars or make your own with very few if any restrictions on your artistic freedom.You can visit worlds already made by others or make your own worlds.
Because seamless chat is open source software under the MIT license (both server and client), the technology is not at the mercy of any single commercial or non commercial organization, is immune from bankruptcy and offers freedom to both commerce and the non commercial artist.

Animated Gestures
Gesture Animations can be triggered by key words used in speech or by specifying gesture commands.Shared Events
Events like starting a train for example can be shared by all in the world when it happens.Text to Speech (TTS)
The TTS version of Seamless3d utilises Windows' built in SAPI5 TTS speech engine for chat. Different voices can be specified for your avatar.Seamless Server
Like the Seamless3d modeller/client, the seamless chat server is freely available for all under the MIT licence. If you have the means of being able to run a server from your computer you can run the seamless server from your computer. See tutorials: Running the Seamless3d Server from your computer[3d Modelling Software] [Tutorials] [Forum] [Features] [Download] [Gallery] [FAQ] [Chat] [Avatars] [Links] [Thyme]